Showing posts with label Recipes. Show all posts

Thursday, November 8, 2012

Mini Pumpkin Donuts


So you guys all know how much i LOVE muffins,
particularily muffins of the fall-pumpkin-cinnaminy persuasion...
...but did you know that you can make donuts but call them muffins?
I may have died and gone to heaven.


These little babies are baked not fried, so they are, erm, good for you.
And you don't need anything special to make them, just a mini muffin pan and a plastic bag.


Simply mix up the batter, put a tbsp or so in each mini muffin cup, and bake away!


Let them cool for a few minutes, then shake them up in a bag filled with delicious cinnamon-sugary goodness.
My only warning is that these must be eaten the day you sugar coat them,
I found out the hard (and sad) way that the sugar coating tends to melt if left for too long : (
The good news is that they are so good not many of them will last long enough for this to happen!


Last but not least,
high five yourself for making donuts that aren't fried and greasy,
and making muffins taste even better than usual : )


Recipe HERE


ENJOY!


Tuesday, September 11, 2012

Pumpkin Cinnamon Streusel Muffins


Muffins make me happy.

They make me happy because they are sweet and yummy and (sometimes) even good for you.
They make me happy because i am always hungry, pregnant or not.
They make me happy because they are usually super easy and quick to make.
But mostly they make me happy because a certain little someone who doesn't seem to eat anything at all
will pretty much always chow down on a homemade muffin.

These muffins make me happy for all the above stated reasons, AND because they are pumpkin. 
 We all know pumpkin means fall, right?  And we all know how much I LOVE FALL, right?
Right.  See?  Happiness is....


Pumpkin Cinnamon Streusel Muffins

Yield: 18ish muffins

1 cup white flour
3/4 cup whole wheat flour
1 tsp baking soda
1/2 tsp salt
1/2 tbsp cinnamon
1 1/2 tsp nutmeg
1 1/4 cup sugar
1/2 cup vegetable oil
1/3 cup water
1 cup canned pumpkin
2 eggs
1 tsp vanilla extract

Preheat oven 350F.  Line your muffin pan with liners, or spray with cooking spray.
Mix together the flour, baking soda, salt, cinnamon, and nutmeg in a medium bowl.  Set aside.
In a large bowl mix together the sugar, oil, water, pumpkin, eggs and vanilla until smooth and combined.
Slowly stir in the flour mixture until completely combined.

Streusel Topping:

1/2 cup oats
1 tsp flour
2 tbsp brown sugar
Dash cinnamon
2 tbsp cold butter

In a small bowl mix together the oats, flour, sugar, and cinnamon.
Cut in the butter (i used my fingers) until the mixture is all crumbly and well, streuselly.

Fill muffin cups up 3/4 of the way with batter and top with the streusel topping.
Bake 17 - 20 minutes until a toothpick comes out clean and they are all nice an golden brown.
Let them cool at least a tiny bit before devouring.


The original recipe I followed (found HERE) had loads more sugar and about 3 times as much streusel topping.
And although I am surprised (and mildly ashamed) to admit it, there is such a thing as too much streusel.
I pretended I was making them healthier by cutting back on all that sugar and topping,
and swapping in some whole wheat flour.
Next time I will also try cutting out some of the oil by using more pumpkin
(and because really, have you seen the size of those cans of pumpkin? they are gigantic!)

Happy fall baking!!


Wednesday, August 8, 2012

Lemony Raspberry Bars

When i was little my brother and i had an area of the garden for our sandbox / swing set.
I'm pretty sure my first dump truck ride courtesy of my brother ended with me being unceremoniously deposited there,
and we spent many many days pumping those swings as high as they could go.

Eventually, the thrill of jumping off the swing at it's peak and trying not collide with the shed lost it's luster,
and our playground was replaced with raspberry bushes that produce some of the tastiest little red gems i have ever eaten.
And while that delicious little raspberry patch is sadly some 4000 kms away, 
farmer's markets and grocery stores are brimming with pints of these yummy red berries right now.
I just can't resist them, and suddenly, my fridge is harbouring multiple little green baskets full of juicy goodness.

What to do with all of these fugitive berries?  
Easy!  Bake these luscious creamy lemony squares.  
cool.  slice.  eat.  repeat.   


Crust:
1 1/2 cups graham cracker crumbs
6 tbsp butter, melted
1/4 cup sugar

Filling:

2 lrg. egg yolks
1 - 14oz (392grams) can fat free sweetened condensed milk
1/2 cup fresh lemon juice ( i used 1/3 cup bottled lemon juice and could have put in more)
1 tsp. lemon zest
3/4 cup fresh raspberries

Preheat oven 350F. Spray an 8x8 inch baking dish with spray.
Combine the crumbs, butter and sugar in a medium sized bowl until crumbs are moist.
( you can get fancy here and add some lemon zest to the crumbs here too)
Press the crust mixture into your sprayed pan (use a measuring cup) and bake for 10 minutes.
Remove and cool to room temperature.

Then combine the egg yolks and condensed milk, and stir in the lemon juice and zest.
Stir until it begins to thicken, then carefully fold in your little red friends. Be gentle or you will have pink bars!
Pour this mixture over the cooled crust and bake for 15 or so minutes, (mine took a bit longer) or until just set.
Cool to room temperature, then chill for at least an hour before serving.
These can be kept in the refrigerator for up to five days, though i highly doubt they'll last that long...


So easy, so summery, and so damn tasty!


Original recipe from HERE.


Monday, June 18, 2012

Chicken Broccoli Braid


Around here, i am notorious for making super fiddley, time-consuming food.
Case in point: The first time i attended one of Dr. Nails' family gatherings i brought the yummiest individual baked cheesecakes. 
( Ahem, talk about setting the bar high! )
What most people don't know is that (most of the time) these things are actually super easy to make,
and just look really hard.


This recipe is certainly no exception: looks hard, super easy!


Dr. Nails had brought home some of those Pillsbury crescent rolls in a can 
(not something we normally have, but hey, i am not one to let a good ingredient die in the fridge...)
 so i threw together some stuff i had in the crisper and wrapped it up in dough!


Seriously, once anything's wrapped up in dough it's just yummy.


Chicken Broccoli Braid Recipe HERE!


Next time we are contemplating a pepperoni and mushroom filling.
Oohh, or what about seafood? Shrimp? Lobster? Scallops?
Yes Please!


Tuesday, June 5, 2012

Quesadilla's!


One day last week all of a sudden it was five o'clock and i found myself without a plan.
Now, understand that i almost always have a plan when it comes to food,
so this was a bit of a rare occurrence, and i was somewhat at a loss.
But then i spied the chicken leftover from the night before, and i knew exactly what i had to do,
make quesadilla's!

Quesadilla's are super easy, can be made with any leftover meat/seafood you happen to have,
and are something i almost always have everything for.


Simply take your tortilla, layer up your meat, any veggies you like, and lots of cheese,
fold in half and bake in the oven or fry in a lightly oiled pan until crisp and golden, and cheese is melty and gooey.

I like to use caramelized onions, corn, red peppers and pickled jalapenos with chicken,
but the sky's the limit here, put in whatever you like!
How about leftover turkey, cranberry sauce and brie?  (is it horrible that i am thinking of thanksgiving already?)
Or shrimp, tomato, onion, cilantro, and mango salsa?
Or my fav, leftover bbq'ed steak, caramelized onions and sauteed mushrooms with cheddar!
Top with sour cream, salsa, and guacamole, and life is good indeed : )


Friday, April 27, 2012

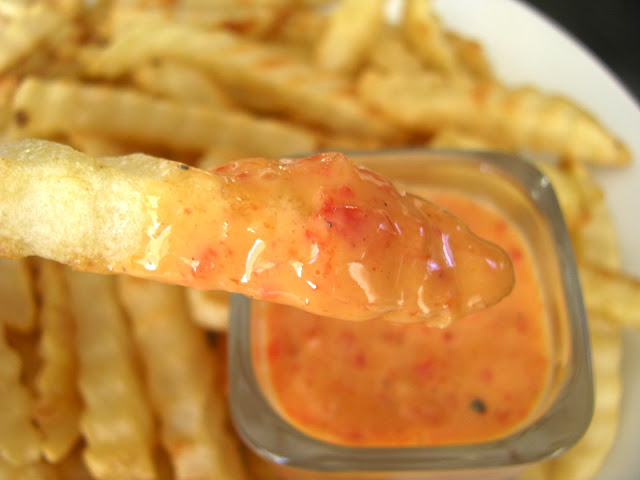
Roasted Red Pepper Mayo


Because sometimes plain old mayo just isn't enough...


So you're out at a restaurant (yes, very occasionally we do venture out of the sticks!)
and you order fries with your meal, because, um, you're out so it's okay to be bad right?
The waitress asks if you would like blahblahblah dipping sauce to go with?  Um, yes please!
Nine times out of ten the flavoured mayo they give you is bomb,
and you proceed to dip the entire meal in it's delicious creamy goodness, not caring if others are staring.

Well, I decided that it was okay to be bad at home every now and then too, 
and if a restaurant can make it, well dammit, i can too.


I went all (ahem) french and ate this with fries, but the next day we put it on sandwiches and were blown away!
Of course, i was too busy eating to take an actual photo, but swap in for mayo on your favorite 
sammy and you might never go back to plain old boring mayo again!


Roasted Red Pepper Mayo

1 Red Pepper, roasted and skin removed (i cheated and used the jarred variety - easy!)
1 large clove of garlic
1/4 cup mayo
A squirt of lemon juice
Salt and Pepper to taste

This is too easy... 
Put the garlic clove in the food processor and give it a few pulses, just for a headstart.
Add everything else and let it go until desired consistency is reached.
Season to taste with S &P.
Enjoy!

Ps - let it sit for a while in the fridge to let the flavours really come together!


Happy Friday : )


Wednesday, April 11, 2012

Creamy Butternut Squash Lasagne


When i get an idea in my head i usually have to run with it, especially when it comes to food.
And with winter (slowly) fading away, i feel the need to get my fill of cosy comfort food
before i am stuck eating salads and barbecued foods for another summer.
So when i had half a squash left in the fridge and was craving comfort food and lasagne sprang to mind, 
i knew i had to follow through.

Now, like any lasagne, this has various steps, and takes time.
The steps are really easy though, and once you've made this you might never go back to regular old laz again!
Lucky me, I have a child that usually naps for a few hours in the afternoon, 
allowing me to make such yummy things on a weekday.


Like your basic lasagne this consists of four things:  Noodles, Sauce, Filling, and Cheese.  
Lots and lots of cheese. 

Creamy Butternut Squash Lasagne

12 Lasagne Noodles - i used spinach noodles
1 medium Butternut Squash
8 - 10 Mushrooms - use your favorite type - i think these were just regular button mushies
A few handfuls of Spinach
Lots and lots of Cheese - I used Mozzarella and Parmesan

Preheat the oven to 375 Fahrenheit.
Lightly grease a 9 x 13 deep oven proof lasagne pan
Peel, seed and cube the squash and toss with a bit of olive oil and some salt and pepper.
Arrange on a baking tray and roast 30 or so minutes, stirring occasionally, until soft and caramelized.
Remove from oven and allow to cool a bit, then squish them up a bit to make it easier to spread.
Cook you noodles as directed on the package, drain and set aside.
Slice up the mushrooms, get your spinach ready, and grate up the cheese.
Having everything ready makes it easier to assemble the lasagne.

Sauce:

2 Tbsp Butter or Margarine
2 Tbsp Flour
2 cups Milk - I use skim to keep calories down
Dash of Nutmeg
1/4 cup Parmesan
Salt & Pepper

In a saucepan melt the butter on medium heat, then add the flour and allow to cook for a minute, stirring.
Slowly add the milk, whisking constantly to avoid lumps.
Allow to cook for a few minutes, stirring often, until bubbling and thickened.
Take off the heat, add nutmeg, S & P, and stir in Parmesan.


Now you just have to put it all together!
Start with a light layer of sauce in the bottom of your pan, then layer 3 noodles side by side.
Layer half of the butternut squash on top of the noodles, then some more sauce.
Add another layer of noodles, then the mushrooms and spinach, then sauce.
More noodles, the rest of the squash, and more sauce.
The last noodles, the rest of the sauce and your grated cheeses

Cover with foil ( i usually spray the side that will be near the cheese with pam to avoid it from sticking)
and put in your already heated oven.  Cook for 30 minutes, until bubbling.
Remove foil and cook another 20 minutes or so, until the cheese is nice and golden.
Remove and let sit for 5 - 10 minutes to set up, then enjoy!


Tuesday, March 27, 2012

Blueberry Almond Sald with Creamy Poppyseed Dressing


Mmmmmmm.
OK, so i know it's not summer and blueberries are certainly not in season in Nova Scotia.
But after the taste of summer we just had with last week's heat wave, I find myself craving summery food.
So i couldn't help myself when i saw these perfectly juicy blueberries at the grocery store,
and what's more summery than a spinach salad with fresh fruit in it?!


The salad is super simple:  Spinach.  Red Onion for some bite.  Blueberries.  Toasted Almonds.
Or you can use Strawberries, raspberries, cranberries, walnuts, cashews, pecans, whatever blows your hair back.


Dressing: makes 2 - 3 servings

1/4 cup fat free mayo
2 tbsp milk
2tbsp sugar
1 tbsp cider vinegar
1 - 2 tsp poppy seeds
Salt & Pepper to taste

I simply put the ingredients together in a small mason jar and shake them up,
Using a jar makes storing leftovers easy too, just put on the lid and pop it in the fridge for lunch tomarrow!

Enjoy!


{ A Stylish Lady }


Monday, March 19, 2012

Green Pea Pesto


Sometimes there is definitely such a thing as too much of a good thing.
This is NOT one of those cases.

This is a case of precisely enough of every ingredient to make a great thing.
Your regular run of the mill pesto is made up mostly of basil, which can be expensive to buy, or if you've got a super green thumb and manage to grow the stuff you know that only so much grows on one little basil plant at a time.
 This version uses just enough of it to add a gorgeous herby flavour without being super bossy or over-powering, 
and without decimating your stash.  The peas add a nice sweetness, and really stretch out your basil, leaving plenty on your plant for other yummy things, like salsa, or bruschetta. mmm.


You just buzz it all up in your handy dandy little food processor.  Eazy peazy, lemon squeezy.
Toss with hot pasta for a super easy side dish (i like to use orzo, just 'cause),
smear it on crusty bread and top with shaved parmesan for an easy app, or even use it as a dip.
Hell, sometimes I even eat it with a spoon, but don't tell anyone.


Makes approx. 2 cups  (which is a lot - i tend to half the recipe for the two and a half of us)

1 cup frozen peas, thawed
3 tbsp parmesan cheese
2 cloves garlic, minced
1 tsp lemon juice
1/2 cup loosely packed basil leaves, chopped
2 tbsp olive oil

Put everything except the oil into the food processor and let 'er rip.
You're supposed to slowly add the olive oil in a thin stream, but my little processor doesn't have a spot to do that,
so i just add it in two batches, buzzing well in between.
Make it as chunky or smooth as you want, and enjoy!


Friday, March 9, 2012

Homemade Granola Bars


A while ago I professed my love for homemade peanut butter granola.
Naturally i love granola bars too, and the Little and I daily occasionally share one for a snack.
While they might be tasty, the store bought ones are undoubtably full of bad fats and preservatives, 
and i do try to avoid packaged food for the most part, just 'cause.
So that, coupled with the fact that the nearest grocery store is 20 minutes up the road and i was under no circumstance leaving this house today (due to my sheer laziness, and the thought of hauling a 15 month old 
around in the rain is just super unappealing to me today)
I simply decided to make my own!  If only all of life's decisions were so easy...

Homemade Granola Bars


These are really easy, took only one bowl (yes!) and mere minutes to make, and baked in roughly 25 minutes.
I would have barely set foot in the store: )


Preheat oven to 350 degrees, and grease a 9 x 13 inch baking pan.

In a large bowl simply mix together:
2 cups Rolled Oats
3/4 cup Brown Sugar
1/2  cup Bran / Wheat Germ - or you could just add more flour
1 cup Flour - I used half whole wheat
3/4 tsp Cinnamon
3/4 tsp Salt

Now add in your fun stuff, which should equal about a cup:
Chocolate chips, raisins, dried cranberries or blueberries, coconut, sunflower seeds, sesame seeds, peanuts....etc!
I just took a one cup measure and added raisins, coconut and sunflower seeds until it overflowed a bit.

Make a well in the centre and add in:
1/4 cup Oil (add this first, it will help everything else slide right out of your measuring cup)
1/4 cup Honey
1/2 cup (or more!) Peanut Butter
2 tsp. Vanilla
& One Egg, lightly beaten.

Mix 'er all up with a wooden spoon / your hands and pat it into your prepared pan.
Chuck it in the oven and bake for 25 - 30 minutes, until the bars begin to turn golden at the edges.
Remember - your oven is your own beast!  Mine runs hot, and I left the bars in for 25 minutes which made them crunchy, which is just the way i like 'em.  If you want chewier bars pull them out sooner rather than later!

Cool for only 5 minutes, then cut into your bars while still warm. (they'll be too hard to cut if you let them cool).


Enjoy and Happy Friday!!!!


 { Recipe adapted from HERE }